Developing Strength & Stability in the Foot, Ankle, and Lower Leg
In my previous article "Calf Muscle Tightness, Achilles Tendon Length and Lower Leg Injury" I discussed some common running-related injuries of the foot, ankle, and lower leg. Keeping the mechanisms and dysfunctional movement patterns that cause injury to these areas in mind, we will now look into ways of effectively strengthening the foot, ankle, and lower leg muscles.
As we saw last month, the joints of the foot and ankle serve as both a rigid lever and a mobile adaptor- depending on the phase of the running stride they are in. When there is weakness, imbalance, poor activation, or poor coordination of the muscles in these areas, the foot/ankle system doesn’t function properly. This can lead to increased stress and over-worked muscles in one area, which creates soreness and tightness (such as severe calf tightness). This then forces the body to compensate with aberrant movement patterns that can lead to overuse injury.
These issues can be prevented, corrected, and improved by strengthening the muscles of the foot, ankle, and lower leg in a holistic and functional manner. In this column I will show a variety of exercises that will improve the strength, and therefore the stability, of these areas.
First, lets look a little deeper into the anatomy of the foot, ankle, and lower leg to understand what we will be strengthening:
The human foot alone contains over 100 muscles! Figure 1 below shows only a small portion of the muscles visible on the bottom of the foot. Some of them only run between bones within the foot, these are called intrinsic foot muscles. Most are very small, but they are all crucial to maintaining the integrity of the arches and joints of our feet.
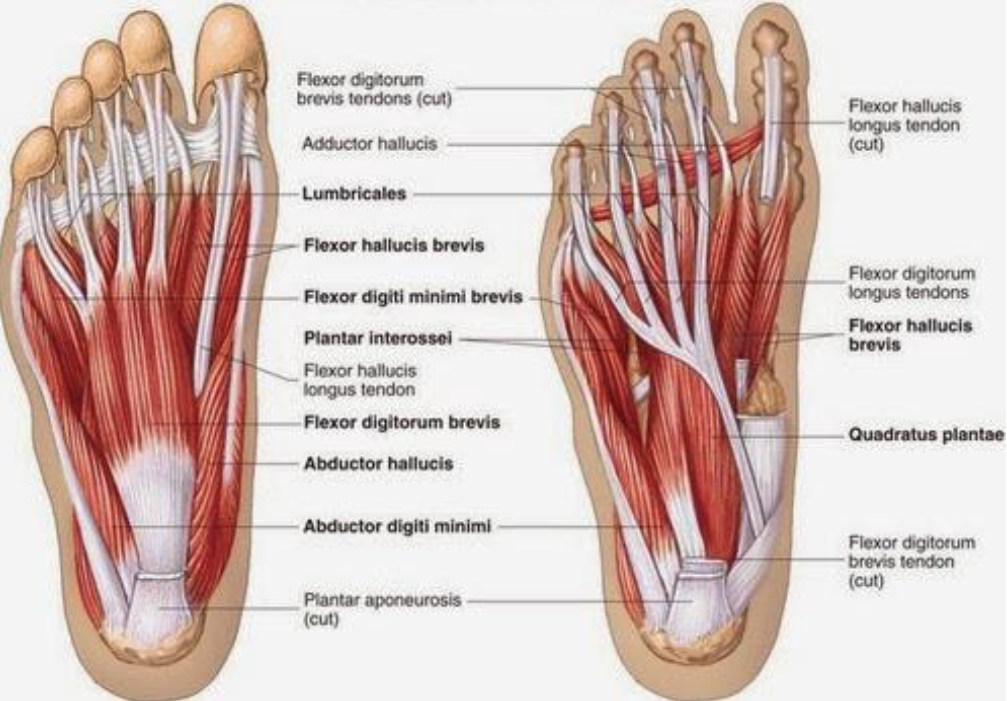
Fig. 1
In contrast, the ankle joint itself actually does not have very many muscles within it. Most of the muscles that we commonly associate with the ankle begin or end in the foot or lower leg, with their tendons crossing over and around the ankle to give it stability. There are special bands of ligament-like tissue called retinacula that wrap around the ankle to keep all those tendons in place, as you can see in Figure 2 below.
Don’t get me wrong, it is still absolutely vital for athletes (or anyone for that matter!) to have strong and stable ankles. However, from an anatomical standpoint, the muscles around the ankle- in the foot and lower leg- are where that strength and stability comes from.
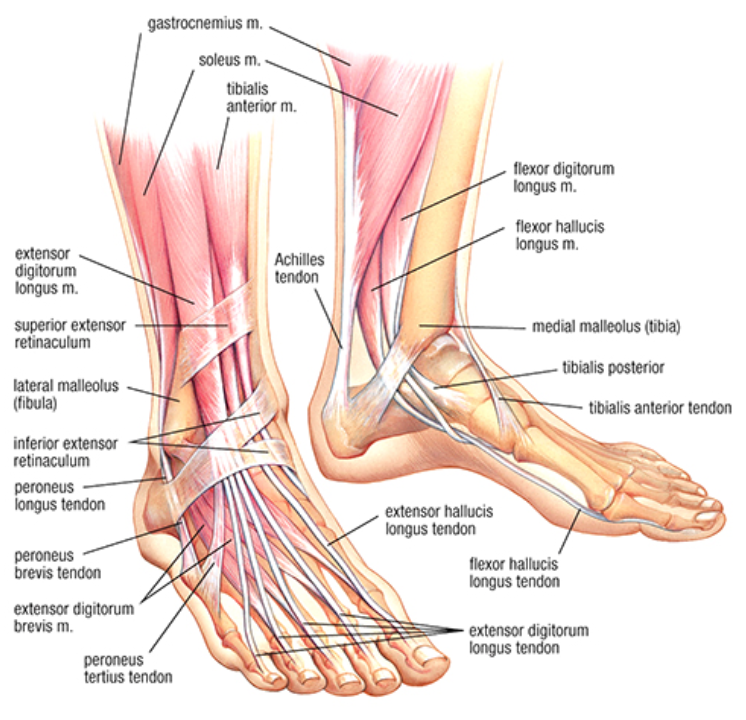
Fig. 2
We discussed some of the major musculature of the calf last month, but let’s dig a little deeper. There are smaller muscles that reside under and around the gastrocnemius and soleus, which help to provide stability to the ankle and lower leg. The peroneus brevis, longus, and tertius run along the outside of the calf. The tibialis posterior, flexor digitorum longus, and flexor hallucis longus run along the back and inside of the calf, all visible in Figure 3 below.
All of these small muscles, with their complicated latin names, cross through the ankle joint and attach to the bones of the midfoot and toes. To simplify things- these are the muscles that play a large role in stabilizing the ankle, and I will refer to them generically as ‘calf muscles’ in the exercise descriptions that follow.
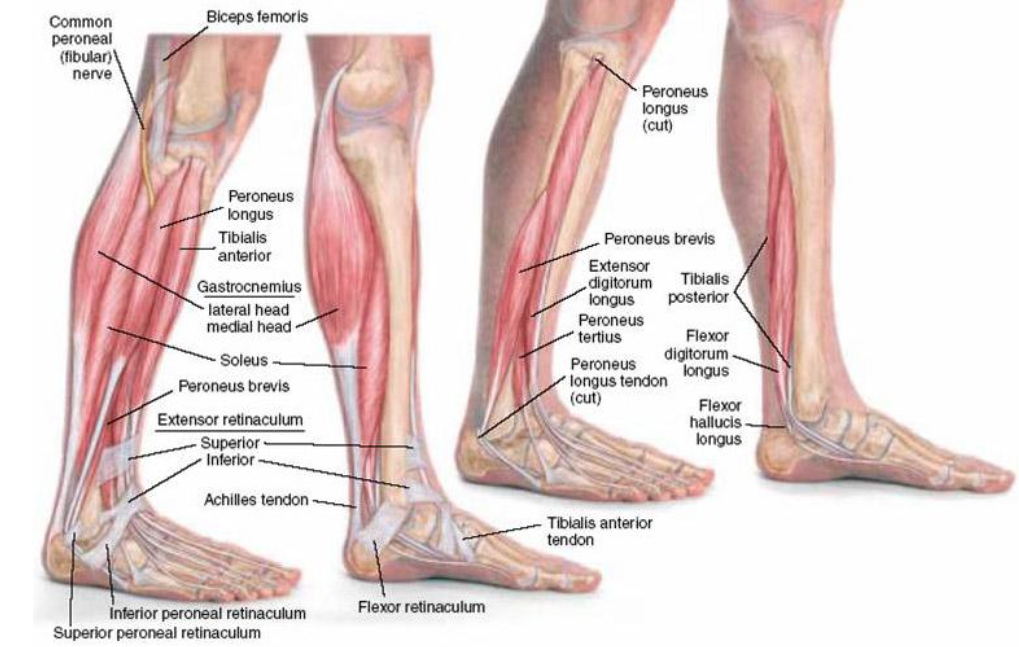
Fig. 3
Before we begin looking into specific exercises I would like to express my opposition to a common misconception concerning these areas: Many people assume that if they have ankle or Achilles tendon issues that they need to focus on strengthening the calf muscles. While these muscles are obviously very important for walking and running, I feel that in many cases it is much more effective to address the strength and stability of the foot.
Without strong and engaged feet, the arches of the feet that influence the alignment of the entire kinetic chain (ankles, knees, hips, back, etc.) cannot maintain their shape or effectively support our weight. The exercises that I prescribe to strengthen the feet will also strengthen the calf muscles by association, and will help to realign the muscles and joints of the lower leg closer to their ideal. I feel that this approach is much more effective than more traditional exercises that only target the large muscles of the calf because they create coordination and synergistic activation between the foot and calf muscles. It’s about working more efficiently, not harder.
I would also urge that these exercises be performed barefoot whenever possible. Much of the instability in the foot and ankle occurs when our feet are inactive. A highly supportive or cushioned shoe- while great for running long distances- disengages the foot from the ground. The foot then “falls asleep” inside the shoe, instead of being the active and dynamic structure it was meant to be. Let me be clear that I am not a proponent of running through the streets or woods sans shoes- shoes are great at protecting our feet and I run in them every day, but strengthening the foot and lower leg barefoot allows us to maximize the strength of our bodies.
With that said, let’s get to the exercises!
I’ve broken them down into three different phases: Early, Intermediate, and Advanced. Each phase will build upon the one preceding it, so there is a progression from mobility and coordination of movement to synergistic strength.
I have also used red and yellow lines and arrows on some of the pictures to illustrate the finer points of each exercise. Yellow lines indicate form or alignment cues, while red lines indicate movement in a certain direction.
Early phase: mobility and coordination.
To start, we must ensure that the foot, ankle, and calf have the necessary mobility to begin to develop coordination throughout the system. Focus on moving through the full range of motion and moving in a slow, deliberate manner.
Toe splay
This can be an exercise in and of itself, but it is really a form cue for performing any stability or strength exercises: Toe splay. A healthy and strong foot naturally has space between the toes, so we want to train with space between them as well. This allows the toes to do their job of stabilizing our feet, ankles, and legs when bearing weight. This is also why you want to be sure you have ample room in the toebox of athletic shoes.
At first you may need to actually use your fingers to fan your toes apart, as in the picture below, but as you get stronger you’ll find it easier to move your toes by themselves!
Ankle alphabet
This is a great beginning exercise to get all of the muscles active and gain some mobility.
To perform this exercise: Sit on a bench or chair and trace the letters of the alphabet in the air with your big toe as in the picture below. Use controlled, slow motions to exaggerate the shape of each letter. Be sure to use your ankle to control the motion, not just your toes, and not your whole leg. Go through the entire alphabet on each foot twice, alternating feet.
Towel Grab
This exercise will start to get the small muscles within the foot active. To perform this exercise, Sit on a chair or bench, spread a towel out on the floor in front of you and place one foot on it. Reach (splay) your toes out as far as you can and grab the towel with your toes to pull it in under your foot. Keep going until you’ve reeled the towel all the way in, then straighten out the towel and go again. This may be very difficult at first, but just trying to grab the towel will strengthen the muscles and you’ll be good at it with a little patience and practice. Perform twice on each foot, alternating feet
Unilateral stance
This exercise is quite straightforward, but can be deceptively hard if your body is not accustomed to using the small stabilizing muscles of the leg and foot.
To perform this exercise: Simply stand on one foot. As in the picture below, keep your trunk upright, your hips level, your toes splayed, and your knee in line with your second toe (the one next to your big toe).
To start, try to hold this position for 30 seconds on each leg without touching the other foot down for balance. Work your way up to 90 seconds, then try 30 seconds with eyes closed. It’s much harder with closed eyes because it forces our body to rely on input from the inner ear and feedback from the joints to maintain balance. You’ll find your feet and ankles working harder when you close your eyes. For an even greater challenge try standing on a foam pad or a pillow.
Toe and heel walks
The name of this exercise says it all… To perform this exercise: Walk on your tiptoes for 30 feet, being sure to maintain the alignment of your ankles and knees with your second toe. Walk 30 feet back to the starting line on your heels, with your toes held up the whole time. Repeat 3 times.
Intermediate phase: endurance and control
Once we have started to develop coordination and mobility, the emphasis shifts to increasing the endurance of the muscles and the ability to maintain stability when we start to fatigue. Focus on maintaining proper form and alignment even when you start to get tired.
Down With Two, Up With One
To perform this exercise: Stand with the balls of your feet on (heels hanging off) a block or a step approximately 6 inches high where you have a wall or rail you can use for balance- the bottom step of a stairway works great for this. Take one foot off the step and raise yourself up onto your toes in a smooth and controlled motion. Be sure that the arch of the foot doing the raising is not collapsing inward. Your toes should be engaged and gripping the step. Place the other foot back on the step and slowly lower your heels back down to the starting point.
Complete 2 sets of 15 repetitions on each side, alternating feet.

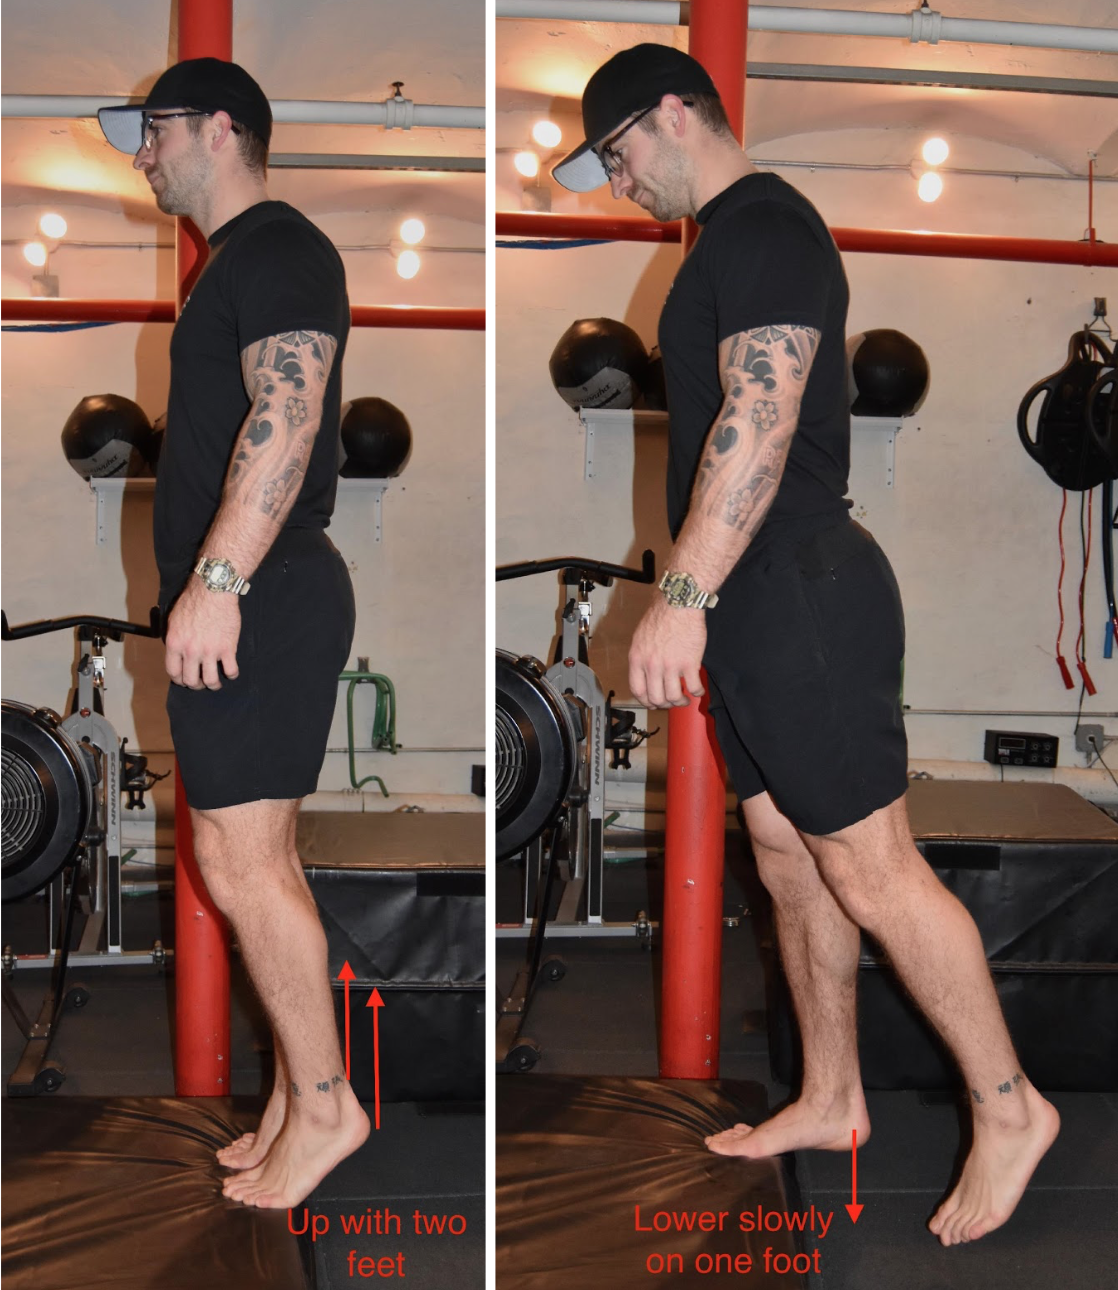
Up With Two, Down With One
This can be thought of as the opposite of the preceding one. To perform this exercise: Stand on a step with both heels hanging off, balls of the feet on the step. Raise yourself up onto your toes with both feet, then lift one foot off the step and slowly lower yourself down with the other leg. Go up again with both feet and repeat.
Start with 2 sets of 10 repetitions on each side, then gradually work your way up to 2 sets of 30, alternating feet.
Marching Form Drill
This exercise helps to isolate the feet and calf muscles while incorporating their action into the running stride. To perform this exercise: Stand in a hallway or open area. Drive one knee up, as if you were running, hold that knee up then rise onto the toes of the foot on the floor, as in the picture below. Slowly lower the heel back down and take a step forward with the leg that was in the air, and repeat.
It should look as if you are doing a high-step march with a heel raise in the middle of each step. There should be a slight pause between each motion when you have to engage the muscles of the feet and core to maintain balance. It feels a bit awkward and choppy at first, but it is very helpful in developing control during each phase of gait.
Complete 2 sets of 30 ft.
Advanced phase: integration and synergy
Now that the endurance of the muscles is beginning to come around, the emphasis is on integrating the movement throughout the legs and into the core so that the body works as a movement system for maximum efficiency.
Note: The following three exercises require a Bosu Ball, which can be found at most gyms or fitness facilities. If you don’t have access to one, a Bosu makes a great addition to a home gym. They are a little pricey, but can be used for endless strength and balance activities and are well worth the investment to stay healthy and strong!
Bosu Rocks (Front/Back, Left/Right)
These will truly challenge the stability and strength of your feet, ankles, and lower legs. Be sure to do all work on a Bosu barefoot! Socks can slip and make this very dangerous!
To perform this exercise: Stand with one foot in the center of the flat side of the Bosu. Be sure your toes are splayed. Find your balance and slowly rock the Bosu to the front and back, trying to touch the front and back edge to the floor. Keep your trunk upright and hips level, as in the video below. -Complete 2 sets of 10 rocks on each foot, alternating feet.
Next, rock the Bosu left and right using only your foot and ankle. Your trunk should remain upright, your hips level, and your knee should not twist. Press down through your big toe and the medial side of your foot to rock one way, then press down with your pinky toe and the lateral side of your foot to go the other way. The motion of the Bosu may be very small- that is fine, engagement of the muscles is what we’re going for. -Complete 2 sets of 10 rocks on each foot, alternating feet.
Bosu Circles
To perform this exercise: Stand on one foot in the center of the flat side of the Bosu with toes splayed. Find your balance and slowly rock the Bosu in a circle, using only your foot and ankle. The rest of your body should remain upright, with hips level and no twisting of the knee. Perform 2 sets of 10 circles clockwise, and 10 counterclockwise on each foot, alternating feet.
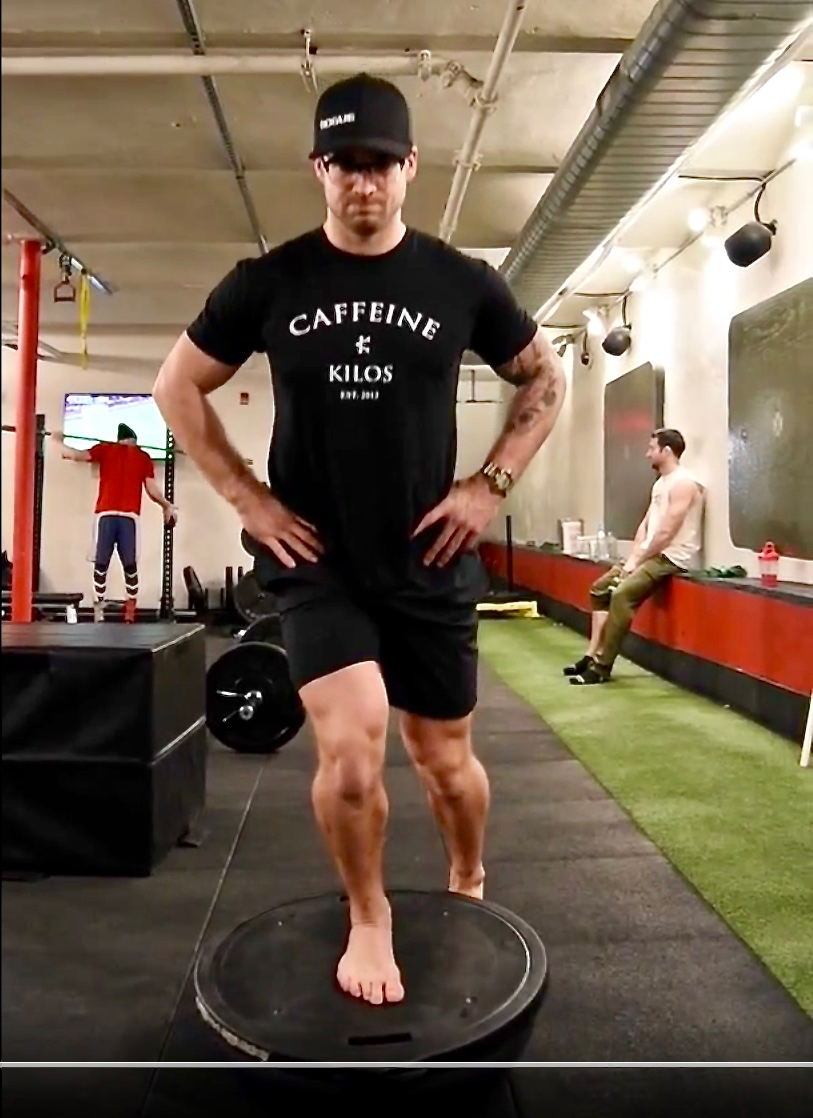
Bosu Mini-Squats
To perform this exercise: Stand on one foot in the center of the flat side of the Bosu. Find your balance and bend your knee to perform a small squat, keeping your whole foot (heel to toes) in contact, as in the picture below. Try to keep the flat side of the Bosu as level as possible. Your other leg should go out behind you and only touch the floor if needed to stay balanced. Your hips should be level, with the knee aligned over your second toe, and your knee should not go forward past your toes. This should not be a deep squat, it is actually just a small knee bend with control being the key. -Complete 2 sets of 10 mini-squats on each foot, alternating feet.
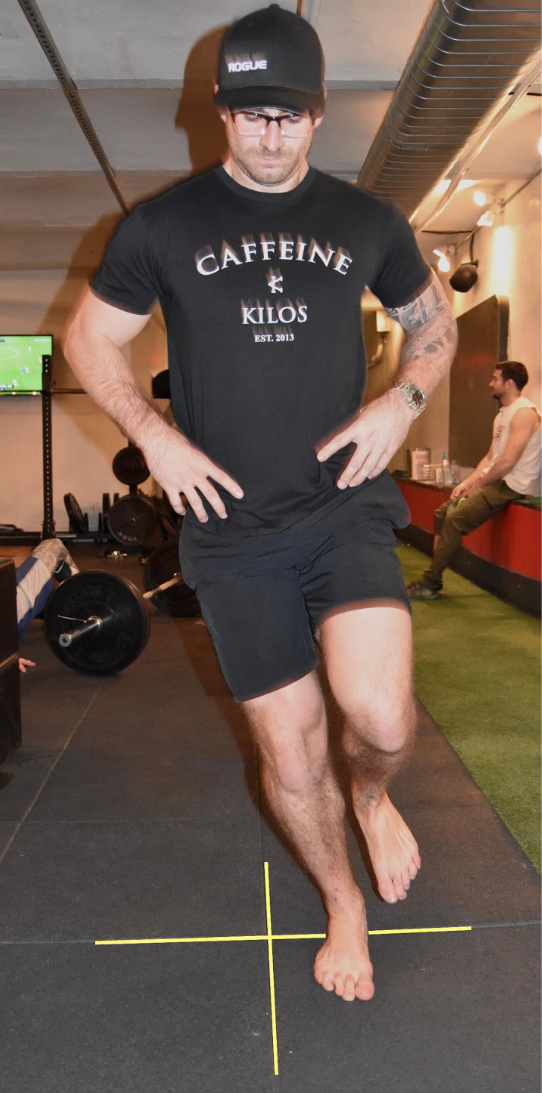
Unilateral hopping
Now that we’ve built up strength and stability, it’s time to apply a more dynamic exercise in the form of hopping on one foot.
To perform this exercise: Use tape to mark an X on the floor so there are four equal quadrants, as in the picture below. Stand on one foot and hop to different parts of the X. Hop forward and back, side to side, and diagonally. Be sure to maintain control and balance, hops should not be done at a frantically fast pace. Take a second to pause and regain balance between each hop to mimic the control required when running on technical terrain. This will not only strengthen the muscles of the foot and lower leg, but will improve neurological coordination of movement. -Start with 30 seconds of uninterrupted hopping on each foot and work up to 90 seconds.
Try to perform these exercises 3 times throughout the week, with a day of rest between. Spend at least two weeks on each phase before moving to the next. It takes time for the body to adapt to changes and incorporate the new strength and movement, so don’t rush things.
It is important to continue to foam roll and stretch throughout the strengthening phases. These exercises are an increased workload for the body to cope with and recover from. You may feel sore in strange places, this is to be expected because you are being forced to use the small muscles of stabilization that aren’t often active when dysfunctional movement patterns have become the norm.
It is also crucial to continue with a long-term “maintenance phase” once strength is developed. Especially during periods of heavy training it’s easy to slide back into weakness and old movement patterns, so some of these exercises should be incorporated into your dynamic warm-up routine or the like.
Happy running!
-Silas
*A huge thanks goes out to Mike Jock of Exceed Physical Culture for providing the space and being the modeling for the pictures included in this column.
Works Cited:
Panariello, R. A. (1991). The closed kinetic chain in strength training. Strength & Conditioning Journal, 13(1), 29-33.
Lentell, G. L., Katzman, L. L., & Walters, M. R. (1990). The relationship between muscle function and ankle stability. Journal of Orthopaedic & Sports Physical Therapy, 11(12), 605-611.
Yu, J., Park, D., & Lee, G. (2013). Effect of eccentric strengthening on pain, muscle strength, endurance, and functional fitness factors in male patients with achilles tendinopathy. American Journal of Physical Medicine & Rehabilitation, 92(1), 68-76.
Headlee, D. L., Leonard, J. L., Hart, J. M., Ingersoll, C. D., & Hertel, J. (2008). Fatigue of the plantar intrinsic foot muscles increases navicular drop. Journal of Electromyography and Kinesiology, 18(3), 420-425.